


Introduction: The Key Question
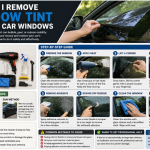
Many car owners eventually ask the same question: How do I remove window tint from my car windows? Whether the tint has become old, faded, bubbled, discolored, or no longer complies with local regulations, removing it can restore your vehicle’s appearance and improve visibility.
Window tint provides several benefits, including privacy, UV protection, and reduced heat inside the vehicle. However, over time, tint film can deteriorate. Exposure to sunlight, heat, and weather conditions can cause the film to peel, crack, or develop unsightly bubbles. When this happens, removing the old tint becomes necessary before installing a new one or returning the windows to their original condition.
The good news is that window tint removal is a task many vehicle owners can perform themselves with the right tools and techniques. Understanding the process can help you avoid damaging your windows and save money on professional removal services.
This guide explains everything you need to know about removing window tint safely and effectively.
Understanding Window Tint and Why It Needs Removal
Before starting the removal process, it helps to understand what window tint actually is.
Window tint consists of a thin polyester film applied to the inside surface of vehicle windows. This film is attached using a strong adhesive that bonds it securely to the glass. While the film itself may peel away relatively easily, the adhesive often remains behind and requires additional cleaning.
Common Reasons for Removing Window Tint
1. Bubbling and Peeling
One of the most common reasons for removal is bubbling. As tint ages, the adhesive can fail, causing air pockets to form between the film and glass.
2. Purple or Discolored Tint
Low-quality tint often turns purple after years of exposure to sunlight. This not only looks unattractive but can also reduce visibility.
3. Scratches and Damage
Window tint can become scratched from daily use, cleaning tools, or contact with objects inside the vehicle.
4. Legal Compliance
Different states and countries have regulations regarding window tint darkness. A vehicle may fail inspection if the tint exceeds legal limits.
5. Replacing Old Tint
Many vehicle owners remove old tint simply because they want a newer, higher-quality film installed.
What You’ll Need Before You Start
Preparing the right tools can make the job significantly easier.
Basic Supplies
- Spray bottle
- Soap and water
- Glass cleaner
- Razor blade or utility scraper
- Plastic scraper
- Garbage bags
- Hair dryer or heat gun
- Microfiber cloths
- Paper towels
- Adhesive remover
- Rubber gloves
Having these items ready before starting will help the process go smoothly.
Method 1: Using Heat to Remove Window Tint
Heat is one of the most effective ways to loosen the adhesive holding the tint film in place.
Step 1: Warm the Tint
Use a hair dryer or heat gun and direct warm air at one corner of the tinted window.
Keep the heat source moving to avoid overheating a single area of glass.
Step 2: Lift a Corner
Once the adhesive begins to soften, use a fingernail or plastic scraper to lift a corner of the tint.
Avoid using excessive force.
Step 3: Slowly Peel the Film
Continue applying heat while gently pulling the film away from the glass.
Pull slowly and steadily.
If the tint tears, simply reheat the area and begin again.
Step 4: Remove Remaining Adhesive
After the film is removed, adhesive residue will likely remain on the glass.
Spray adhesive remover onto the residue and allow it to sit for several minutes before scraping gently.
Advantages of the Heat Method
- Fast process
- Effective on most vehicles
- Minimal chemicals required
Disadvantages
- Requires patience
- Can leave adhesive behind
- Risk of overheating glass if done improperly
Method 2: The Garbage Bag and Sunlight Method
This technique works particularly well in warm climates.
Step 1: Clean the Window
Clean both sides of the window thoroughly.
Step 2: Spray Soapy Water
Spray a generous amount of soapy water on the outside of the glass.
Step 3: Apply a Black Garbage Bag
Place a black garbage bag over the wet surface.
Trim it to match the window shape.
Step 4: Spray Ammonia Inside
Spray ammonia onto the inside tinted surface.
Cover the interior side with another garbage bag.
Step 5: Let the Sun Heat the Window
Allow the vehicle to sit in direct sunlight for one to two hours.
The heat softens the adhesive significantly.
Step 6: Peel Away the Tint
Remove the bags and carefully peel the tint from the glass.
The film should separate much more easily than before.
Advantages
- Very effective
- Uses solar heat
- Minimal scraping required
Disadvantages
- Requires sunny weather
- Longer waiting time
Method 3: Steam Cleaning Method
Many professionals prefer using steam because it softens both the film and adhesive simultaneously.
Step 1: Use a Steam Cleaner
Direct steam at one corner of the tinted window.
Step 2: Lift the Edge
Carefully raise the edge of the film.
Step 3: Continue Steaming
As you peel the tint away, continue applying steam to loosen the adhesive.
Step 4: Clean Residue
Wipe remaining adhesive with glass cleaner and microfiber cloths.
Advantages
- Very clean process
- Reduces adhesive residue
- Professional-quality results
Disadvantages
- Requires access to a steam cleaner
How to Remove Leftover Adhesive
Removing the tint film is only half the job. Adhesive residue often remains on the glass.
Use Adhesive Remover
Commercial adhesive removers are specifically designed for this purpose.
Spray the product generously and allow it to soak.
Scrape Carefully
Use a plastic scraper or razor blade held at a shallow angle.
Avoid excessive pressure.
Wipe Clean
After scraping, clean the window thoroughly with glass cleaner.
Repeat if necessary.
Final Polish
Finish with a microfiber cloth to remove streaks and restore clarity.
Special Considerations for Rear Windows
Rear windows often contain defroster lines and antenna elements.
These thin electrical lines can be damaged during tint removal.
Important Tips
- Avoid aggressive scraping.
- Use plastic tools whenever possible.
- Apply heat or steam rather than force.
- Work slowly around defroster lines.
Damaging these lines can result in expensive repairs.
Common Mistakes to Avoid
Rushing the Process
One of the biggest mistakes is trying to remove the film too quickly.
Slow, steady peeling reduces tearing and leaves less adhesive behind.
Using Excessive Force
Aggressive scraping can scratch glass or damage rear-window components.
Ignoring Safety Precautions
Always work in a well-ventilated area when using chemicals such as ammonia or adhesive removers.
Using Metal Tools Improperly
Metal scrapers should be used cautiously and only on suitable glass surfaces.
Overheating the Glass
Excessive heat can stress the glass and create problems.
Keep heat sources moving continuously.
Should You Remove Tint Yourself or Hire a Professional?
Many vehicle owners successfully remove tint themselves, but professional assistance may be worthwhile in some situations.
DIY Removal
Best for:
- Small vehicles
- Simple side windows
- Budget-conscious owners
- Individuals comfortable with basic vehicle maintenance
Professional Removal
Best for:
- Luxury vehicles
- Rear windows with complex electronics
- Severely deteriorated tint
- People wanting the fastest results
Professional services typically cost less than replacing damaged glass or defroster lines.
Tips for Installing New Tint After Removal
If you plan to apply new tint immediately, preparation is critical.
Clean Thoroughly
Any remaining adhesive can interfere with proper installation.
Inspect the Glass
Check for scratches, chips, or damage before applying new film.
Choose Quality Tint
High-quality films generally last longer and resist discoloration better.
Follow Local Laws
Verify legal tint limits in your area before installation.
This helps avoid fines and inspection failures.
Frequently Asked Questions
How long does it take to remove window tint?
Most vehicles require between one and four hours depending on the condition of the tint and the removal method used.
Can I use a hair dryer instead of a heat gun?
Yes. A hair dryer is often safer and works well for most tint removal projects.
Will tint removal damage my windows?
Proper removal generally does not damage glass. However, careless scraping can scratch the surface or damage rear defroster lines.
Is ammonia necessary?
No. Heat, steam, and commercial adhesive removers can also be effective.
Can I remove tint without chemicals?
Yes. Heat and steam methods often require little or no chemical assistance.
Conclusion
If you’ve been wondering, “How do I remove window tint from my car windows?”, the answer is that several proven methods can get the job done safely and effectively. Heat, steam, and sunlight-assisted techniques are among the most popular options because they soften the adhesive and make the tint easier to peel away.
The key to success is patience. Taking your time during removal reduces the risk of damaging the glass and minimizes leftover adhesive. After the film is removed, thorough cleaning ensures the window is clear, safe, and ready for new tint if desired.
Whether you choose the DIY route or hire a professional, understanding the process helps you make informed decisions and maintain your vehicle’s appearance and visibility. With the right tools and careful attention, removing old window tint can be a straightforward project that significantly improves the look and functionality of your car.