


The Key Question: How Can You Clear a Check Engine Light?
Few dashboard warnings create more concern than the check engine light. When this light suddenly appears, many drivers immediately wonder whether the problem is serious and how they can turn the warning off. The most common question is simple: how do you clear a check engine light safely and correctly?
While clearing the light may seem straightforward, the process is not always as simple as pressing a button or disconnecting the battery. In many cases, the light is a warning sign that your vehicle’s onboard computer has detected a problem. Therefore, understanding the cause before attempting to clear the warning is essential.
Many drivers make the mistake of erasing the light without fixing the underlying issue. As a result, the warning often returns after a short period. In some situations, ignoring the cause can even lead to more expensive repairs later.
Fortunately, by understanding why the light appears and following the proper steps, you can determine whether the issue is minor or requires professional attention. More importantly, you can learn the safest methods to clear the warning without causing additional problems.
Understanding the Check Engine Light
Before attempting to clear the warning, it is important to understand what the check engine light actually means.
Modern vehicles contain an onboard diagnostic system known as OBD-II (On-Board Diagnostics). This system constantly monitors engine performance, emissions equipment, fuel delivery, ignition timing, and many other components.
Whenever the computer detects a problem outside normal operating parameters, it stores a diagnostic trouble code and activates the check engine light.
What Does the Light Indicate?
The warning may appear for a variety of reasons, including:
- Loose gas cap
- Faulty oxygen sensor
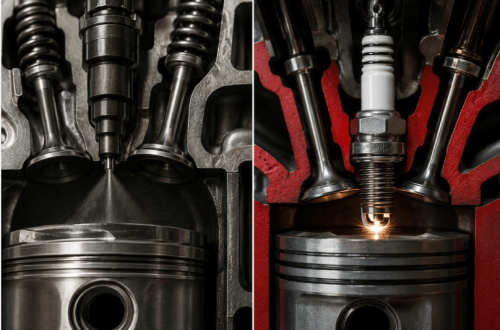
- Malfunctioning spark plugs
- Bad catalytic converter
- Mass airflow sensor issues
- Ignition coil problems
- Fuel system faults
- Emissions-related concerns
Because many different issues can trigger the warning, guessing the cause is rarely a good idea.
Solid vs. Flashing Check Engine Light
The type of warning also matters.
Solid Check Engine Light
A solid light generally indicates a non-emergency issue. Although the vehicle may continue operating normally, diagnosis should not be delayed.
Flashing Check Engine Light
A flashing light usually indicates a serious engine problem, often involving a misfire. In this situation, driving should be minimized because engine damage may occur.
Consequently, clearing a flashing warning without repairs is never recommended.
Why the Check Engine Light Appears
Understanding common causes can help determine whether the issue is simple or complex.
Loose or Damaged Gas Cap
Surprisingly, one of the most common causes is a loose fuel cap. When the cap fails to seal properly, fuel vapors can escape and trigger an emissions-related warning.
Fortunately, tightening the cap may solve the problem.
Oxygen Sensor Failure
The oxygen sensor measures the amount of oxygen in the exhaust system. Over time, this sensor may fail and send inaccurate information to the engine computer.
As a result, the check engine light may illuminate.
Spark Plug Problems
Spark plugs play a critical role in engine combustion. Worn plugs can cause poor performance, rough idling, and reduced fuel efficiency.
Eventually, the vehicle computer may detect the issue and activate the warning light.
Mass Airflow Sensor Issues
The mass airflow sensor helps determine how much air enters the engine. If the sensor provides inaccurate readings, engine performance can suffer significantly.
Consequently, the onboard computer may store an error code.
Catalytic Converter Problems
A failing catalytic converter often triggers a check engine warning. Since replacement costs can be high, diagnosing the problem early is important.
How to Clear a Check Engine Light
Once the problem has been identified and repaired, the warning can usually be cleared using one of several methods.
Method 1: Use an OBD-II Scanner
This is the safest and most reliable method.
Step 1: Locate the Diagnostic Port
Most vehicles have an OBD-II port located beneath the dashboard near the driver’s seat.
Step 2: Connect the Scanner
Plug the scanner into the port and turn the ignition key to the ON position.
Step 3: Read Diagnostic Codes
The scanner will retrieve stored trouble codes from the vehicle’s computer.
Step 4: Repair the Problem
Before clearing the codes, ensure the underlying issue has been fixed.
Step 5: Erase the Codes
Select the “Clear Codes” or “Erase Codes” option on the scanner.
Afterward, the check engine light should disappear.
Because this method directly communicates with the vehicle computer, it is generally considered the preferred approach.
Method 2: Tighten the Gas Cap
If a loose gas cap caused the warning, the solution may be simple.
First, turn off the engine.
Next, remove the gas cap and inspect it for cracks or damage.
Then, reinstall the cap securely until it clicks several times.
After driving for several trips, the computer may automatically reset itself and turn off the warning light.
Although this method works only in specific situations, it is worth checking because the fix costs nothing.
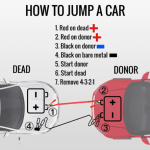
Method 3: Disconnect the Battery
Some drivers use the battery-disconnection method to clear stored codes.
Steps
- Turn off the vehicle.
- Disconnect the negative battery cable.
- Wait approximately 15 to 30 minutes.
- Reconnect the cable securely.
- Start the engine.
In many vehicles, this process resets the onboard computer.
However, this method has drawbacks. Radio settings, clock settings, and other stored preferences may be erased. Additionally, the warning light often returns if the problem remains unresolved.
For this reason, battery disconnection should not be considered the best long-term solution.
Method 4: Drive the Vehicle Normally
After repairs have been completed, many vehicles automatically clear the warning light.
The computer continuously performs system checks during normal operation. Once enough successful driving cycles occur, the warning may disappear without manual intervention.
Therefore, patience is sometimes all that is required.
Mistakes to Avoid When Clearing a Check Engine Light
Many vehicle owners make avoidable mistakes when dealing with dashboard warnings.
Ignoring the Underlying Problem
Simply clearing the light does not repair the vehicle.
If the root cause remains present, the warning will almost certainly return.
Assuming the Problem Is Minor
While some issues are relatively harmless, others can become expensive if ignored.
Therefore, every warning should be investigated promptly.
Replacing Parts Without Diagnosis
Many drivers replace sensors or components based on guesswork.
Instead, reading diagnostic codes first can save significant time and money.
Clearing Codes Before Recording Them
Diagnostic codes provide valuable information.
Consequently, recording the codes before erasing them is always a good idea.
Continuing to Drive With a Flashing Light
A flashing warning often signals a serious problem.
In such situations, immediate diagnosis is recommended to prevent engine damage.
When You Should Seek Professional Help
Although some issues are easy to address, others require expert diagnosis.
Professional assistance may be necessary if:
- The light returns repeatedly
- The engine runs poorly
- Fuel economy drops significantly
- The vehicle stalls unexpectedly
- A flashing warning appears
- Multiple dashboard warnings illuminate simultaneously
Professional technicians have advanced diagnostic equipment that can identify problems more accurately than basic scanners.
As a result, repairs are often completed more efficiently.
Conclusion
Learning how to clear a check engine light is useful for every vehicle owner, but clearing the warning should never be the first step. Instead, identifying and repairing the underlying problem should always come first.
In many cases, a loose gas cap or minor sensor issue may be responsible. However, more serious engine or emissions problems can also trigger the warning. Therefore, reading diagnostic trouble codes with an OBD-II scanner is the most effective way to understand the cause.
Once repairs are completed, the light can be cleared using a scanner, through normal driving cycles, or in some cases by disconnecting the battery. Nevertheless, simply erasing the warning without addressing the issue rarely solves the problem permanently.
By diagnosing problems correctly, performing timely repairs, and using proper reset procedures, drivers can keep their vehicles running efficiently while avoiding costly future repairs.
Frequently Asked Questions (FAQs)
1. Can I clear a check engine light without fixing the problem?
Yes, the light can often be cleared temporarily, but it will usually return if the underlying issue remains unresolved.
2. How long does it take for a check engine light to reset itself?
After a successful repair, the light may turn off after several driving cycles, depending on the vehicle and the stored code.
3. Will disconnecting the battery clear the check engine light?
In many vehicles, disconnecting the battery may reset the computer and clear the warning. However, the light often returns if the issue still exists.
4. Is it safe to drive with the check engine light on?
A solid light may allow limited driving, but diagnosis should occur soon. A flashing light requires immediate attention.
5. What is the easiest way to clear a check engine light?
Using an OBD-II scanner is generally the easiest and most reliable method.
6. Can a loose gas cap trigger a check engine light?
Yes, a loose, damaged, or improperly sealed gas cap is a common reason for the warning to appear.
7. Why does my check engine light come back after clearing it?
The light usually returns because the underlying problem has not been fixed or because a new issue has been detected by the vehicle’s computer.