


Introduction: Why Knowing How to Jump a Car Matters
Few situations are more frustrating than getting into your car, turning the key or pressing the start button, and hearing nothing but a clicking sound. A dead battery can leave you stranded at home, in a parking lot, or even on the side of the road. Fortunately, learning how to jump a car is one of the most useful skills every driver should know.
Jump-starting a vehicle is a simple process that uses another vehicle’s battery or a portable jump starter to provide enough power to start a car with a dead battery. While the procedure is straightforward, it must be done correctly to avoid damaging the electrical system or causing injury.
This guide explains everything you need to know about how to jump a car safely, why car batteries die, the equipment you’ll need, common mistakes to avoid, and what to do after your vehicle starts.
The Key Question: How Do You Jump a Car Safely?
The most common question drivers ask is:
“What is the correct way to jump-start a car without damaging the battery or electrical system?”
The answer is simple: follow the correct connection sequence, use quality jumper cables, and observe proper safety precautions.
The basic process involves:
- Positioning the vehicles correctly.
- Connecting jumper cables in the proper order.
- Starting the donor vehicle.
- Starting the vehicle with the dead battery.
- Disconnecting the cables safely.
Although it sounds easy, reversing cable connections or skipping safety steps can create sparks, damage electronics, or even cause battery explosions.
Understanding the process before an emergency occurs can save time, money, and stress.
Understanding Car Batteries and Why They Die
Before learning how to jump a car, it helps to understand what a car battery actually does.
A vehicle battery stores electrical energy and supplies power to:
- The starter motor
- Headlights
- Interior electronics
- Infotainment systems
- Power locks and windows
- Sensors and control modules
When you start your vehicle, the battery delivers a powerful burst of electricity to the starter motor, which cranks the engine.
Once the engine is running, the alternator takes over and recharges the battery.
Common Reasons a Battery Dies
1. Leaving Lights On
One of the most common causes of a dead battery is leaving headlights, interior lights, or accessories on overnight.
2. Extreme Weather
Very hot or very cold temperatures can reduce battery performance and lifespan.
3. Old Battery
Most car batteries last between three and five years. As they age, their ability to hold a charge decreases.
4. Faulty Alternator
A failing alternator may not recharge the battery properly while driving.
5. Corroded Battery Terminals
Corrosion can interfere with electrical connections and prevent charging.
6. Short Trips
Frequent short drives may not allow enough time for the alternator to fully recharge the battery.
Knowing the cause of a dead battery can help prevent future problems.
Equipment Needed to Jump a Car
Before beginning, gather the necessary tools.
Jumper Cables
A quality set of jumper cables should be:
- At least 10 to 20 feet long
- Made with thick-gauge wire
- Equipped with sturdy clamps
Higher-quality cables transfer power more efficiently.
Another Vehicle
Traditionally, jump-starting requires another vehicle with a healthy battery.
The donor vehicle should:
- Have a battery of similar voltage
- Be parked close enough for the cables to reach
- Be turned off initially
Portable Jump Starter
Many drivers now prefer portable jump starters.
These compact devices:
- Eliminate the need for another vehicle
- Are easy to store
- Can provide multiple jump starts per charge
They are excellent emergency tools.
Safety Precautions Before Jumping a Car
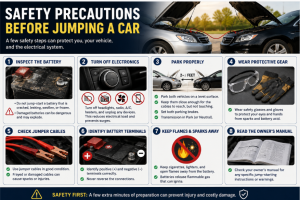
Safety should always come first.
Before connecting any cables:
Inspect the Battery
Do not attempt to jump-start a battery that is:
- Cracked
- Leaking
- Swollen
- Frozen
Damaged batteries can be dangerous.
Turn Off Electronics
Switch off:
- Headlights
- Radio
- Air conditioning
- Charging devices
This reduces electrical load during startup.
Wear Protective Gear
Safety glasses and gloves provide additional protection against sparks and battery acid.
Park Properly
Ensure both vehicles are:
- In Park (automatic transmission)
- In Neutral (manual transmission)
- With parking brakes engaged
Step-by-Step Guide: How to Jump a Car
Now let’s go through the process carefully.
Step 1: Position the Vehicles
Park the donor vehicle close to the disabled vehicle.
The batteries should be close enough for the cables to reach but the vehicles should not touch.
Turn off both engines.
Open both hoods.
Locate the batteries.
Step 2: Identify Battery Terminals
Every battery has:
Positive Terminal (+)
Usually marked with:
- A plus sign
- Red cover
- Red cable
Negative Terminal (-)
Usually marked with:
- A minus sign
- Black cover
- Black cable
Never confuse these terminals.
Step 3: Connect the Red Positive Cable
Attach one red clamp to the positive terminal of the dead battery.
Attach the other red clamp to the positive terminal of the good battery.
Double-check the connections.
Step 4: Connect the Black Negative Cable
Attach one black clamp to the negative terminal of the good battery.
Attach the final black clamp to an unpainted metal surface on the disabled vehicle.
Examples include:
- Engine block
- Metal bracket
- Chassis ground point
Avoid attaching it directly to the dead battery’s negative terminal whenever possible.
This reduces the risk of sparks near the battery.
Step 5: Start the Donor Vehicle
Start the vehicle with the healthy battery.
Allow it to run for several minutes.
This begins transferring charge to the dead battery.
Step 6: Start the Dead Vehicle
Attempt to start the disabled vehicle.
If it doesn’t start immediately:
- Wait another few minutes.
- Try again.
Do not crank the engine continuously for long periods.
If the vehicle still won’t start after several attempts, another issue may be present.
Step 7: Disconnect the Cables
Once the vehicle starts, remove the cables in reverse order.
- Remove black clamp from grounded metal surface.
- Remove black clamp from donor battery.
- Remove red clamp from donor battery.
- Remove red clamp from revived battery.
Keep the clamps from touching each other.
Step 8: Keep the Engine Running
Drive the vehicle for at least 20 to 30 minutes.
This allows the alternator to recharge the battery.
Longer drives are often better.
Using a Portable Jump Starter
Portable jump starters have become increasingly popular.
The process is similar:
- Turn off the vehicle.
- Connect the red clamp to the positive terminal.
- Connect the black clamp to the negative terminal or designated ground.
- Turn on the jump starter.
- Start the vehicle.
- Disconnect the device.
Many modern units include reverse-polarity protection and built-in safety features.
Common Mistakes to Avoid
Even experienced drivers occasionally make mistakes.
Connecting Cables Incorrectly
Mixing positive and negative terminals can damage:
- Battery
- Alternator
- Computer systems
- Sensors
Always verify connections.
Letting Clamps Touch
Metal clamps touching each other can create dangerous sparks.
Keep them separated.
Jumping a Damaged Battery
Never jump-start a visibly damaged battery.
Replace it instead.
Ignoring Corrosion
Heavy corrosion can prevent proper electrical contact.
Clean terminals before attempting a jump start.
Turning Off the Vehicle Immediately
Many drivers shut the car off after a successful jump.
Doing so may leave the battery insufficiently charged.
Drive for at least 20 to 30 minutes afterward.
What If the Car Still Won’t Start?
Sometimes jump-starting doesn’t solve the problem.
Possible causes include:
Failed Starter Motor
The battery may be fine, but the starter cannot crank the engine.
Bad Alternator
The alternator may not be charging the battery.
Battery Beyond Recovery
Old batteries eventually lose their ability to hold a charge.
Electrical Issues
Loose wiring, blown fuses, or faulty sensors may prevent starting.
Fuel Problems
In some cases, the issue has nothing to do with the battery.
A mechanic can perform diagnostic testing to identify the cause.
How to Prevent a Dead Battery
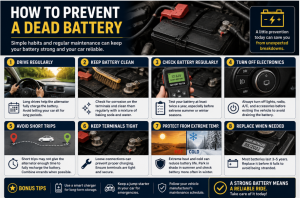
Prevention is easier than dealing with a breakdown.
Regular Battery Testing
Have your battery tested annually.
Most auto parts stores offer free battery checks.
Keep Terminals Clean
Remove corrosion periodically.
Clean terminals ensure proper charging.
Drive Regularly
Vehicles left sitting for extended periods often develop battery issues.
Replace Aging Batteries
Most batteries should be replaced every three to five years.
Carry a Portable Jump Starter
A portable jump pack can save you from waiting for roadside assistance.
Turn Off Accessories
Always verify that:
- Headlights
- Interior lights
- Charging devices
are turned off before leaving your vehicle.
Frequently Asked Questions
Can I Jump-Start Any Vehicle?
Most gasoline-powered vehicles can be jump-started using standard procedures.
However, some hybrid and electric vehicles have unique requirements. Always consult the owner’s manual.
How Long Should I Let the Donor Vehicle Run?
Typically, five to ten minutes is sufficient before attempting to start the dead vehicle.
Is It Safe to Jump a Car in the Rain?
Yes, if proper precautions are followed. Modern automotive electrical systems are designed to operate in wet conditions.
Can a Completely Dead Battery Be Jump-Started?
Sometimes yes, but severely damaged or deeply discharged batteries may require replacement.
How Often Can a Battery Be Jump-Started?
Repeated jump starts indicate an underlying problem that should be diagnosed.
Conclusion
Knowing how to jump a car is an essential skill that every driver should learn. A dead battery can happen unexpectedly due to weather, age, human error, or mechanical issues. By understanding the correct jump-start procedure and following proper safety practices, you can quickly get back on the road without damaging your vehicle.
The process involves positioning the vehicles correctly, connecting the jumper cables in the proper order, starting the donor vehicle, starting the disabled vehicle, and safely disconnecting the cables. After a successful jump start, driving the vehicle allows the alternator to recharge the battery.
More importantly, preventive maintenance can significantly reduce the likelihood of future battery problems. Regular battery inspections, clean terminals, routine driving, and carrying a portable jump starter can make a major difference.
The next time your vehicle refuses to start because of a dead battery, you’ll know exactly what to do and how to do it safely.